
After serveral years of studies and trial, I finally get a Hackintosh working with spared parts. I know the cost for a proper Mac Book Pro is far below my time cost, but it is really a great learning experience for me.
Before I start, here is my hardware list, I just purchase 2nd parts, with my old parts and my brother-in-law decomissioned parts.
Intel E3-1275 (Sandy Bridge)
Biostar B75S3E (B75 mATX board)
Asus GT1030 2GB
Crucial BX500 240G SSD
Basically it covers the following major steps. I use Hackintosh Zone High Sierra for installation.
https://www.hackintoshzone.com/files/file/1044-niresh-high-sierra/
1. Setup the BIOS according to the Hackintosh guide
2. Setup the Hackintosh with relevant settings
3. Upgarde to 10.13.6 (3 Updates)
4. Use Clover Configurator to setup the SMIBIOS, prepare for Web Drivers and enable SSDT flags for power management
5. Use Multibeast to install a bunch of Drivers
6. Install Nvidia Web Driver to enable the graphics acceleration of GT1030
7. Convert APFS and configure mount point noatime to preserve SSD wearing
8. Homebrew
9. Enjoy!!
The detail procedure is as followed
2. Setup the Hackintosh with relevant settings
I have done the following settings in the configuration for Installing the base MacOS
a. Enable Network
b. Enable USB Support for Intel 7/8/9 family USB
c. Disable NullCPUPowerManagement (enable by Default)
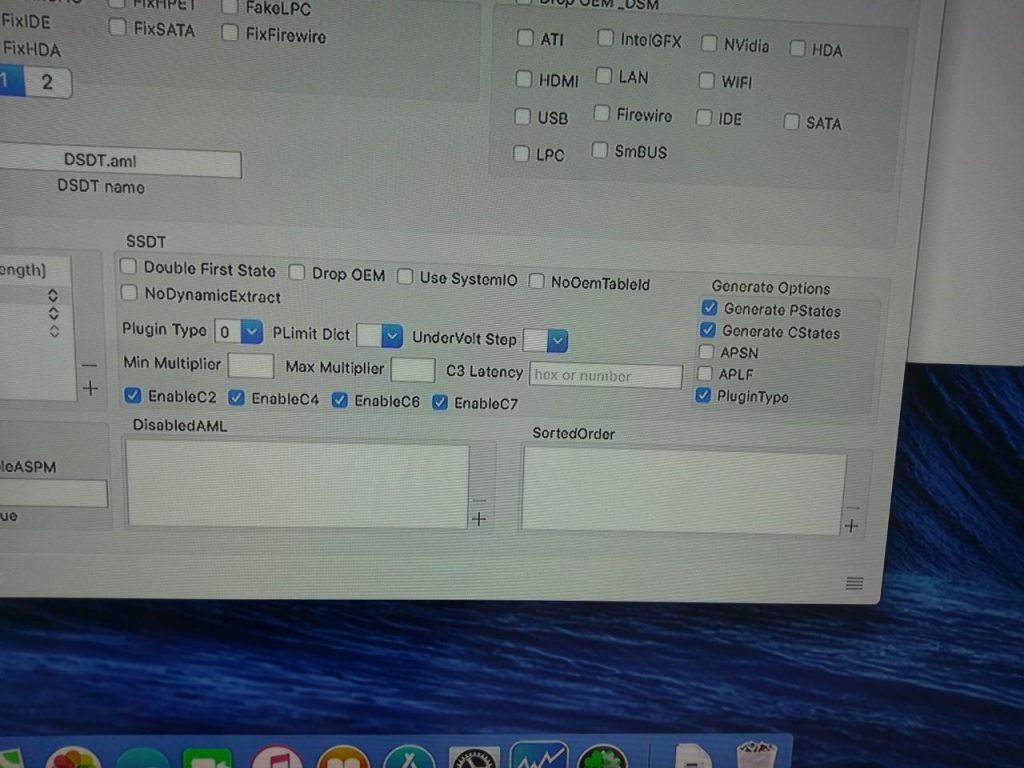
4. Use Clover Configurator to setup the SMIBIOS, prepare for Web Drivers and enable SSDT flags for power management
Primarily, this settings is for SSDT to enable power management in Clover Configurator. My Settings are as followed.
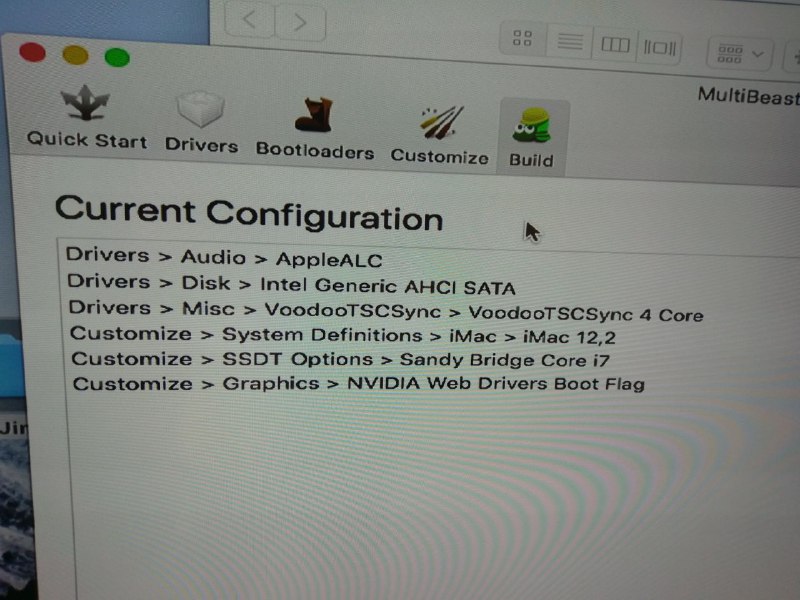
5. Use Multibeast to install a bunch of Drivers.
Multibeast is used to install a bunch of drivers to fit my hardware. The list is as followed.
6. Nvidia Web Drivers
Nvidia Web Driver is provided by nVidia (not Apple) to drive the latest GeForce series graphics card. Unfortunate, it supports only up to High Sierra, no Majove or Catalina. We could download here. It has to match with your MacOS version, including sub-version and patch level
https://www.tonymacx86.com/nvidia-drivers/
7. APFS and noatime mount options
APFS is the latest file system of MacOS which support SSD Trim command. In the Niresh Hackintosh Disc, it doesn’t come with the drivers, which I cannot install MacOS on my SSD. Therefore, I need to make conversion after installation. Luckily, the installation is very simple.
1. Boot into recovery mode
2. Unmount the Disk
3. Edit => Convert to APFS
In unix file system, it has a function named atime, which will log the time for every file access. It is no big deal in Magnetic hard disk, however, it is a matter for SSD as it hugely increase the wearing of SSD. Furthermore, because it saves a write operation, the disk will also perform slightly faster, especially for compiling program
1. https://gist.github.com/dmitryd/16902ad3a5defd42d012
2. Reboot, check with “mount”
8. Homebrew, https://brew.sh/
/usr/bin/ruby -e “$(curl -fsSL https://raw.githubusercontent.com/Homebrew/install/master/install)”
There are some pitfall which I have encountered, the best recommendation is still strictly follow the tonymacx86 purchase list, and don’t even derivate a single model from it.
https://www.tonymacx86.com/buyersguide/building-a-customac-hackintosh-the-ultimate-buyers-guide/
The pitfall are as followed.
1. Sandy Bridge CPU E3 1275 iGPU is HD P3000 which has a different hardware device ID with a standard Sandy Bridge HD3000. Inject Intel and FakeIntelGPU may work, but fail due to point 2
2. Mix of Sandy Bridge CPU + Ivy Bridge Mainboard will cause issue. Apple treats mainboard as the platform, which you need to match up with CPU and iGPU by configuration SMIBIOS. I cannot get the iGPU working and need to use a GT1030 card
3. MacOS is not happy with nVidia Maxwell and Pascal GPU out of the box, that’s the 9xx and 10xx family. They cannot run on Mojave OR Catalina right now. For High Sierra, nVidia has provide official Drivers named Nvidia Web Driver, You need to pick the right version against your current Mac Version, 10.13.0 has different driver from 10.13.6.
4. Picking a Kelper Nvidia GPU is a MUST for Mojave or Catalina. Comments from forum suggest RX570. I am wondering if a RX460 from China, which is the salvage of Crypto Mining Machine is a good deal
4. You MUST go to Recovery Mode and UNMOUNT the system volume to convert the primary partition to APFS
5. Don’t need to install the NullCPUManagement.kext. The AppleIntelCPUPowerManagement.kext should be fine and working with the Clover C-State parameters
sudo xcode-select --install
/bin/bash -c "$(curl -fsSL https://raw.githubusercontent.com/Homebrew/install/master/install.sh)"


brew install git [email protected] nvm wireguard-tools
nvm use 14
brew tap hashicorp/tap
brew install hashicorp/tap/terraform

curl "https://awscli.amazonaws.com/AWSCLIV2.pkg" -o "AWSCLIV2.pkg"
sudo installer -pkg AWSCLIV2.pkg -target /

brew install --cask intel-power-gadget clover-configurator
brew install --cask iterm2 cheatsheet intel-haxm
brew install --cask maczip foxitreader
brew install --cask google-chrome firefox
xx brew install --cask microsoft-office
brew install --cask sublime-merge sublime-text
brew install --cask visual-studio-code intellij-idea-ce pycharm-ce dbeaver-community
brew install --cask wireguard-tools qbittorrent vlc
brew install --cask whatsapp telegram microsoft-teams
brew install --cask spotify

https://officecdn.microsoft.com/pr/C1297A47-86C4-4C1F-97FA-950631F94777/MacAutoupdate/Microsoft_Office_16.29.19090802_Installer.pkg