Author Archives: jimmy

Running MacOS on Ubuntu – Sosumi

Ubuntu has a Snap package that can run MacOS on KVM. It is a pre-built script that bring out the MacOS up and running automatically.

There are plenty of notes on the web, this passage is just my personal notes.

Pre-Requisite – install KVM utils and assign a common user to KVM group

sudo apt-get install cpu-checker qemu-utils
sudo usermod -a -G kvm,libvirt jimmy
sudo chown root:kvm /dev/kvm
sudo chmod 666 /dev/kvm

Install Sosumi

sudo snap install sosumi --edge

Adjust the default CPU cores, RAM size and disk image size

# Try to launch the VM as a normal user
sosumi 
# immediately close the VM at Clover
# go to snap folder and edit the launch file
cd ~/snap/sosumi/common
nano launch
#modify -m 8G / -smp 8,core=4
qemu-img resize macos.qcow2 +20G

Launch the VM and carry out the standard installation process.

sosumi

Some notes about NewSQL – CockroachDB

I have done some research on CockroachDB recently which make me understand a new class of database called NewSQL.

NewSQL has a few key features which is very attractive, especially we are SQL developers. Corresponding solution in GCP CloudSpanner and AWS Aurora.
1. ACID compliance, but with global locking trade-off
2. Auto-recovery and auto-rebalance under node failure
3. Global Distributed database with localized access of data
4. No phantom read, which maintain global consistency

It sounds pretty attractive in the first view. However, it must be carefully designed in order to enjoy the benefits. Let’s look at how it works first.

0. Define your database cluster topology, which you may define the running instance with Tags, like Region, AZ(AWS Terms), Data Center and Country. These information is useful for locating the table data and index.

1. Each Table will be partitioned by field in columns. The partitioning of data can be done with ENUM for discrete data or range for continous data.

2. Additional Sparse Indexes (Non-primary index) must also be designed with Partition in mind, the best design mechanism is to share the partition key with table data, and add additional fields for improve searching

3. Each Index or Data partition will map to a list of hints which will determine the location that piece of data is stored. CockroachDB will determine the final location by honoring the hints first. However, if there is no living instance which satisfies the hints, it will just pick one node that can spread across the globe.

4. CockroachDB maintains a network latency matrix internally, which keep track of the performance between any 2 nodes. It is a important input to CockroachDB to determine which data partition to update or to read.

5. Each Slice of data, which has a few replica among the living nodes, will elect a “leaseholder” based on table definition hints and usage statistic periodically. All read-write operation MUST go through the leaseholder in order to achieve global consistency and data locking. Since leaseholder is just a pointer among the partition replica, shifting leaseholder is a cheap operation and can change frequently (~10sec) to cope with the shape of traffic.

6. For READ table, the detail mechanism is shown here. The key take away is avoid global query and make the query local, for example, include part of the partition as you searching criterion. The query will route to the leaseholder to process, and the primary concern is the latency between the gateway node and the leaseholder. The performance is excellent in case that everything happens locally.

7. For WRITE table, the detail mechanism is shown here. The key performance trick is the location of majority update. For example, given a 3 replica environment, the leaseholder has to commit 2 out of 3 in order to declare the update is successful, therefore, the delay is related to the 2nd closest replica network latency to the leaseholder.

8. In case of node failure and recovery needed, CockroachDB is doing a great job. It will regenerate the replica at a node that trying to satisfy the hints. Since there are live replica, the performance hits are minimal, and it can self heal when a new instance comes online

9. The DDL and partition configuration can be changed by DDL, Cockroach will help to migrate the slice based on partition hints.

Base on the implementation above, there are some pitfalls which you may keep an eye on.

1. Database topology designs may require some regions clustered together and try to place data locally.

2. Data and Index has to be partitioned seperately, we should put them as closed as possible to make read-write operation localized.

3. Data is committed when majority of partitions report committed to the Leaseholder. It means you need to place the partition wisely and strike a balance between 1) majority of partitions are placed on node which are closed to each others. 2) data must be placed wide apart so that it can archieve Regional replication

4. Average latency measurement
Same City – ~5ms (InterDC dedicated line / AZ)
Same Country, Inter city – ~20ms
Cross Country, e.g. HK-SG – ~50ms
Cross Continenet, e.g. Asia vs EMEA vs US – ~200ms

Base on the latencies, we should be able to precisely predict the expected performance of individual query or operation.

HAPPY CODING!

Example of NGINX reverse proxy config

Common Reverse Proxy

upstream foundation {
    ip_hash;
    server localhost:18080;
    keepalive 8;
}


server {
        listen 443 ssl http2;
        listen [::]:443 ssl http2;

        server_name xxx.jimmysyss.com;

        root /var/www/pwa;
        index index.html;

	location /foundation/ {
		proxy_set_header Connection "";
		proxy_set_header Host $http_host;
		proxy_set_header X-Real-IP $remote_addr;
		proxy_set_header X-Forwarded-For $proxy_add_x_forwarded_for;
		proxy_set_header X-Forwarded-Proto $scheme;
		proxy_set_header X-Frame-Options SAMEORIGIN;
		proxy_pass http://foundation/;
        }

	location / {
                try_files $uri $uri/ /index.html;
#		try_files $uri $uri/ =404;
        }
}
proxy_cache_path /var/cache/nginx levels=1:2 keys_zone=mattermost_cache:10m max_size=3g inactive=120m u$

server {
        listen 443 ssl http2;
        listen [::]:443 ssl http2;

        server_name mattermost.jimmysyss.com;
        index index.html;

   location ~ /api/v[0-9]+/(users/)?websocket$ {
       proxy_set_header Upgrade $http_upgrade;
       proxy_set_header Connection "upgrade";
       client_max_body_size 50M;
       proxy_set_header Host $http_host;
       proxy_set_header X-Real-IP $remote_addr;
       proxy_set_header X-Forwarded-For $proxy_add_x_forwarded_for;
       proxy_set_header X-Forwarded-Proto $scheme;
       proxy_set_header X-Frame-Options SAMEORIGIN;
       proxy_buffers 256 16k;
       proxy_buffer_size 16k;
       client_body_timeout 60;
       send_timeout 300;
       lingering_timeout 5;
       proxy_connect_timeout 90;
       proxy_send_timeout 300;
       proxy_read_timeout 90s;
       proxy_pass http://localhost:8065;
   }

   location / {
       client_max_body_size 50M;
       proxy_set_header Connection "";
       proxy_set_header Host $http_host;
       proxy_set_header X-Real-IP $remote_addr;
       proxy_set_header X-Forwarded-For $proxy_add_x_forwarded_for;
       proxy_set_header X-Forwarded-Proto $scheme;
       proxy_set_header X-Frame-Options SAMEORIGIN;
       proxy_buffers 256 16k;
       proxy_buffer_size 16k;
       proxy_read_timeout 600s;
       proxy_cache mattermost_cache;
       proxy_cache_revalidate on;
       proxy_cache_min_uses 2;
       proxy_cache_use_stale timeout;
       proxy_cache_lock on;
       proxy_http_version 1.1;
       proxy_pass http://localhost:8065;
   }
}

Ansible First Impression

I have tested out Ansible recently for Server admin, the experience is nice but it may take time to understand the whole eco-system.

https://github.com/jimmysyss/ansible-home

There are a few concepts to understand before hand

Ansible uses SSH to execute Python Code in the Client machine, therefore, the Client needs to install OpenSSH and Python by default. It looks up Python 2 by default, a custom parameter is needed to instruct Ansible to use Python 3 instead. Everything makes sense if follows this direction.

Ansible Playbook is the script that drives the client machines to work, there are a lot of build in modules in Ansible. Worst case scenario is using the shell script module to write all commands. In this case, the script may only execute once, and may have side effect if execute more than once.

Ansible Collections and Roles are pre-built extensions for Ansible, a role usually serve one function, for example, managing sysctl.conf service or managing Grub. A collection is a collection of Role that may have multiple functions.

Ansible Galaxy is the marketplace of Ansible Collections and Ansible Roles. However, only those frequently downloaded scripts are useful in general. Others are just for a niche use cases.

Finally, the Ansible comes with Ubuntu 18.04 APT repo are outdated(Version 2.5), you need version 2.8 or 2.9 to be useful. You can install by installing the via installing the Ansible APT library.


sudo apt update
sudo apt install software-properties-common
sudo apt-add-repository --yes --update ppa:ansible/ansible
sudo apt install ansible

When u are using a passphase protected private key, you need to start the local ssh agent and add the private key to the agent.

eval "$(ssh-agent -s)"
ssh-add ~/.ssh/id_rsa

Finally get my Hackintosh (High Sierra) working!!!!!!

After serveral years of studies and trial, I finally get a Hackintosh working with spared parts. I know the cost for a proper Mac Book Pro is far below my time cost, but it is really a great learning experience for me.

Before I start, here is my hardware list, I just purchase 2nd parts, with my old parts and my brother-in-law decomissioned parts.

Intel E3-1275 (Sandy Bridge)
Biostar B75S3E (B75 mATX board)
Asus GT1030 2GB
Crucial BX500 240G SSD

Basically it covers the following major steps. I use Hackintosh Zone High Sierra for installation.
https://www.hackintoshzone.com/files/file/1044-niresh-high-sierra/
1. Setup the BIOS according to the Hackintosh guide
2. Setup the Hackintosh with relevant settings
3. Upgarde to 10.13.6 (3 Updates)
4. Use Clover Configurator to setup the SMIBIOS, prepare for Web Drivers and enable SSDT flags for power management
5. Use Multibeast to install a bunch of Drivers
6. Install Nvidia Web Driver to enable the graphics acceleration of GT1030
7. Convert APFS and configure mount point noatime to preserve SSD wearing
8. Homebrew
9. Enjoy!!

The detail procedure is as followed

2. Setup the Hackintosh with relevant settings
I have done the following settings in the configuration for Installing the base MacOS
a. Enable Network
b. Enable USB Support for Intel 7/8/9 family USB
c. Disable NullCPUPowerManagement (enable by Default)

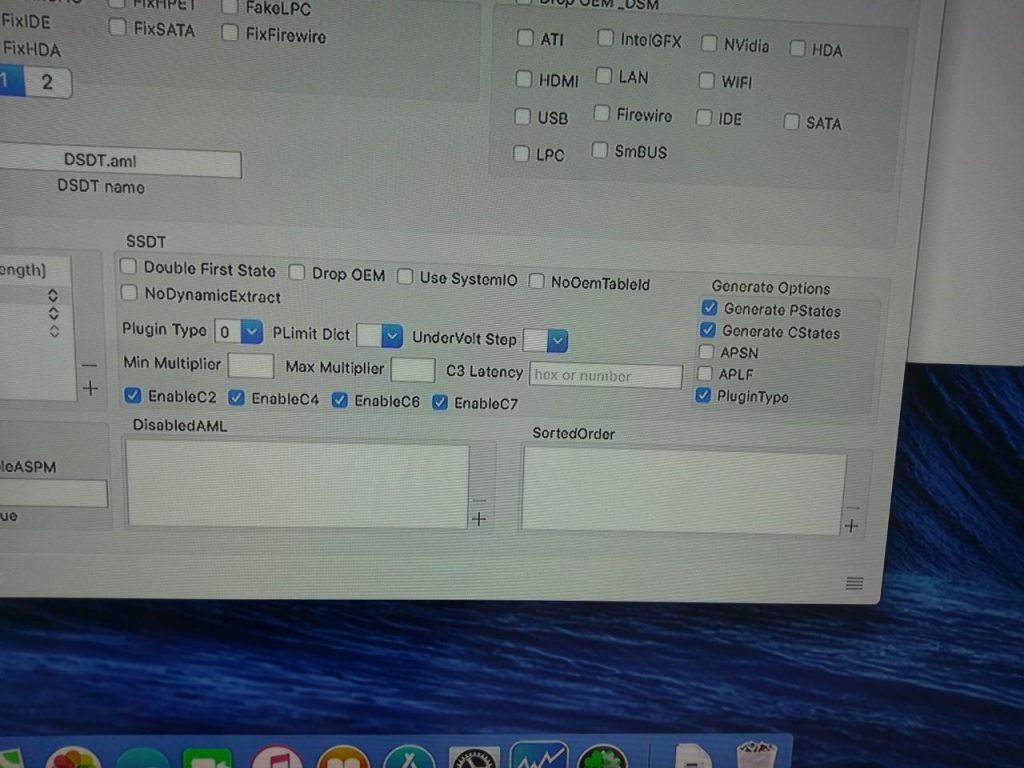
4. Use Clover Configurator to setup the SMIBIOS, prepare for Web Drivers and enable SSDT flags for power management
Primarily, this settings is for SSDT to enable power management in Clover Configurator. My Settings are as followed.

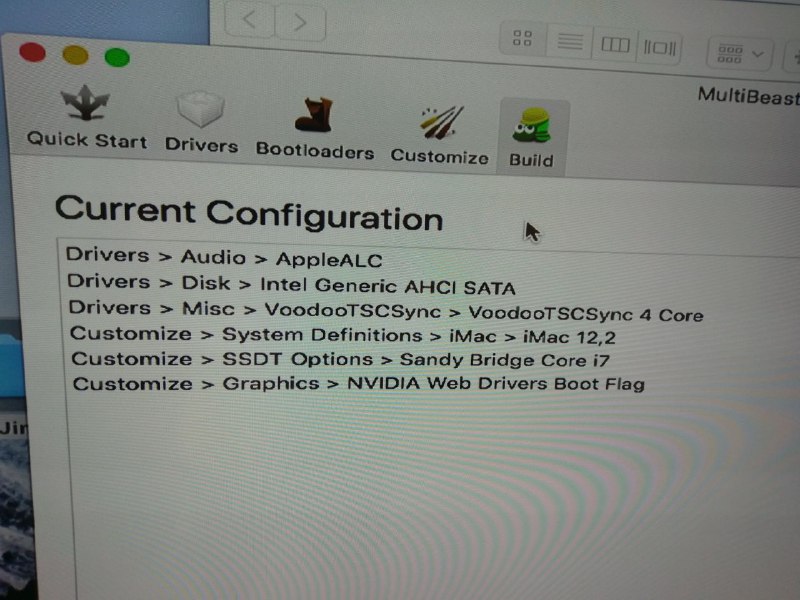
5. Use Multibeast to install a bunch of Drivers.
Multibeast is used to install a bunch of drivers to fit my hardware. The list is as followed.

6. Nvidia Web Drivers
Nvidia Web Driver is provided by nVidia (not Apple) to drive the latest GeForce series graphics card. Unfortunate, it supports only up to High Sierra, no Majove or Catalina. We could download here. It has to match with your MacOS version, including sub-version and patch level
https://www.tonymacx86.com/nvidia-drivers/

7. APFS and noatime mount options
APFS is the latest file system of MacOS which support SSD Trim command. In the Niresh Hackintosh Disc, it doesn’t come with the drivers, which I cannot install MacOS on my SSD. Therefore, I need to make conversion after installation. Luckily, the installation is very simple.
1. Boot into recovery mode
2. Unmount the Disk
3. Edit => Convert to APFS
In unix file system, it has a function named atime, which will log the time for every file access. It is no big deal in Magnetic hard disk, however, it is a matter for SSD as it hugely increase the wearing of SSD. Furthermore, because it saves a write operation, the disk will also perform slightly faster, especially for compiling program
1. https://gist.github.com/dmitryd/16902ad3a5defd42d012
2. Reboot, check with “mount”

8. Homebrew, https://brew.sh/
/usr/bin/ruby -e “$(curl -fsSL https://raw.githubusercontent.com/Homebrew/install/master/install)”

There are some pitfall which I have encountered, the best recommendation is still strictly follow the tonymacx86 purchase list, and don’t even derivate a single model from it.
https://www.tonymacx86.com/buyersguide/building-a-customac-hackintosh-the-ultimate-buyers-guide/

The pitfall are as followed.

1. Sandy Bridge CPU E3 1275 iGPU is HD P3000 which has a different hardware device ID with a standard Sandy Bridge HD3000. Inject Intel and FakeIntelGPU may work, but fail due to point 2
2. Mix of Sandy Bridge CPU + Ivy Bridge Mainboard will cause issue. Apple treats mainboard as the platform, which you need to match up with CPU and iGPU by configuration SMIBIOS. I cannot get the iGPU working and need to use a GT1030 card
3. MacOS is not happy with nVidia Maxwell and Pascal GPU out of the box, that’s the 9xx and 10xx family. They cannot run on Mojave OR Catalina right now. For High Sierra, nVidia has provide official Drivers named Nvidia Web Driver, You need to pick the right version against your current Mac Version, 10.13.0 has different driver from 10.13.6.
4. Picking a Kelper Nvidia GPU is a MUST for Mojave or Catalina. Comments from forum suggest RX570. I am wondering if a RX460 from China, which is the salvage of Crypto Mining Machine is a good deal
4. You MUST go to Recovery Mode and UNMOUNT the system volume to convert the primary partition to APFS
5. Don’t need to install the NullCPUManagement.kext. The AppleIntelCPUPowerManagement.kext should be fine and working with the Clover C-State parameters


sudo xcode-select --install
/bin/bash -c "$(curl -fsSL https://raw.githubusercontent.com/Homebrew/install/master/install.sh)"


brew install git [email protected] nvm wireguard-tools
nvm use 14
brew tap hashicorp/tap
brew install hashicorp/tap/terraform

curl "https://awscli.amazonaws.com/AWSCLIV2.pkg" -o "AWSCLIV2.pkg"
sudo installer -pkg AWSCLIV2.pkg -target /

brew install --cask intel-power-gadget clover-configurator
brew install --cask iterm2 cheatsheet intel-haxm
brew install --cask maczip foxitreader
brew install --cask google-chrome firefox
xx brew install --cask microsoft-office
brew install --cask sublime-merge sublime-text
brew install --cask visual-studio-code intellij-idea-ce pycharm-ce dbeaver-community
brew install --cask wireguard-tools qbittorrent vlc
brew install --cask whatsapp telegram microsoft-teams
brew install --cask spotify

https://officecdn.microsoft.com/pr/C1297A47-86C4-4C1F-97FA-950631F94777/MacAutoupdate/Microsoft_Office_16.29.19090802_Installer.pkg

Installing OracleXE 18 on CentOS on Proxmox VE LXC

Installing Oracle used to be a tedious and error prone operation, it takes my inexperienced colleague a week, but still cannot fix it. I have fixed the server and would make note on the procedures to install Oracle so that I won’t spend too much time on it next time.

Basically I follow the RHEL steps in the following links. CentOS on LXC is exactly the same in the following link.
https://www.oracle.com/database/technologies/appdev/xe/quickstart.html

I need to prepare the environment first as followed. Everything is done by “root”

  • Host Table – Hard Code the hostname in /etc/hosts, with the following line
    10.168.10.90    OracleCentOS
  • Disable IPv6 – seems IPv6 doesn’t work very well in Oracle XE 18, I can only connect locally (with port forwarding) but not from another machine. 
    edit /etc/sysctl.conf , amend the following two lines at the end of filenet.ipv6.conf.all.disable_ipv6 = 1
    net.ipv6.conf.default.disable_ipv6 = 1
  • Install curl for subsequent installation steps
    yum install curl
  • Restart server to make every thing effective. 
    shutdown -r now

And then we could follow the above link “Red Hat compatible Linux distribution” section to install the Oracle

We can get an up-and-running Oracle up to now, however, it can only be connect by sqlplus, you cannot connect to it from external. It is due to the listener settings is not correct yet. So, we need to go through a few post installation configuration steps.

  • Setup the Oracle default DB
    /etc/init.d/oracle-xe-18c configure
  • Modify tnsname.ora and listener.ora, use hostname OracleCentOS and port 1521
    vi /opt/oracle/product/18c/dbhomeXE/network/admin/tnsnames.ora

tnsnames.ora Network Configuration File: /opt/oracle/product/18c/dbhomeXE/network/admin/tnsnames.ora
Generated by Oracle configuration tools.
XE =
(DESCRIPTION =
(ADDRESS = (PROTOCOL = TCP)(HOST = OracleCentOS)(PORT = 1521))
(CONNECT_DATA =
(SERVER = DEDICATED)
(SERVICE_NAME = XE)
)
)
LISTENER_XE =
(ADDRESS = (PROTOCOL = TCP)(HOST = OracleCentOS)(PORT = 1521))

  • vi /opt/oracle/product/18c/dbhomeXE/network/admin/listener.ora

LISTENER =
  (DESCRIPTION_LIST =
    (DESCRIPTION =
      (ADDRESS = (PROTOCOL = TCP)(HOST = OracleCentOS)(PORT = 1521))
      (ADDRESS = (PROTOCOL = IPC)(KEY = EXTPROC1521))
    )
  )

  • Restart the oracle service by the following command 
    /etc/init.d/oracle-xe-18c restart
  • You can verify port 1521 opens with the following command
    netstat -anp | grep 1521

You should be able to connect to the Oracle via IP as sysdba in SQLDeveloper

it is strange that I cannot simply use SQLDeveloper to create user, we need to modify the final SQL to create user a bit. https://stackoverflow.com/questions/33330968/error-ora-65096-invalid-common-user-or-role-name-in-oracle

Therefore, what we do is to add this line in the SQL tab during create user.
alter session set "_ORACLE_SCRIPT"=true;  

PostgreSQL + TimescaleDB + MadLib installation

PostgreSQL is a very very powerful database engine by itself, there are many advanced functions which is far beyond the standard SQL query.

The following combo are great as a starting point with the following functionality.

TimescaleDB – Time Series Database, support time based partitioning of data sharding.
https://docs.timescale.com/latest/getting-started

MadLib – a DB extension to carry out common Machine learning program within the DB.
https://cwiki.apache.org/confluence/display/MADLIB/Architecture

Here are the installation steps.

# install PostgreSQL and PGXN client
deb http://apt.postgresql.org/pub/repos/apt/ bionic-pgdg main
wget --quiet -O - https://www.postgresql.org/media/keys/ACCC4CF8.asc | sudo apt-key add -
sudo apt-get update
sudo apt-get -y install postgresql-10 libpq-dev postgresql-server-dev-10 postgresql-plpython-10 pgxnclient cmake g++ m4

# Include the TimescaleDB PPA
sudo add-apt-repository ppa:timescale/timescaledb-ppa

sudo apt-get update

# Install the TimescaleDB
sudo apt install timescaledb-postgresql-10
sudo timescaledb-tune --quiet --yes

# Install MADLib
sudo pgxnclient install madlib
sudo pgxnclient load madlib 

# Install CStore
sudo apt-get install bison flex git libreadline-dev libz-dev git libpq-dev libprotobuf-c0-dev make protobuf-c-compiler
sudo pgxn install cstore_fdw
sudo pgxn load cstore_fdw

After you installed all of them, you may play around with the example.
https://docs.timescale.com/latest/tutorials/tutorial-hello-nyc

For each newly created db, we need to enable the extensions, for example.

CStore Reference
https://www.citusdata.com/blog/2014/04/03/columnar-store-for-analytics/
https://info.citusdata.com/rs/235-CNE-301/images/Columnar_Store_for_PostgreSQL_Using_cstore_fdw_Webinar_Slides_0915.pdf

CREATE USER jimmy WITH PASSWORD 'xxxxxx';
CREATE DATABASE testdb OWNER=jimmy LC_COLLATE='C' LC_CTYPE='C' template=template0;
GRANT ALL ON DATABASE testdb to jimmy;
\c testdb
CREATE EXTENSION plpythonu;
CREATE EXTENSION madlib;
CREATE EXTENSION timescaledb;
CREATE EXTENSION cstore_fdw;
CREATE SERVER cstore_server FOREIGN DATA WRAPPER cstore_fdw;
GRANT ALL PRIVILEGES ON ALL TABLES IN SCHEMA public to jimmy;
GRANT ALL PRIVILEGES ON ALL SEQUENCES IN SCHEMA public to jimmy;
GRANT ALL PRIVILEGES ON ALL FUNCTIONS IN SCHEMA public to jimmy;

WebDAV Server on Apache

MS Office has native support of WebDAV, you can quickly setup a WebDAV server in Apache for testing, instead of spinning up the fully functioning SharePoint Server.

Here is the quick settings for setting up a Apache WebDAV server.


a2enmod dav
a2enmod dav_fs

And then add a new site in /etc/apache2/sites-available/ as followed.

<VirtualHost *:80>
        ServerName webdav.jimmysyss.com
        ServerAdmin webmaster@localhost
        ServerAlias webdav.jimmysyss.com
        DocumentRoot /var/www/webdav

        ErrorLog ${APACHE_LOG_DIR}/error.log
        CustomLog ${APACHE_LOG_DIR}/access.log combined

        <Directory />
                Options FollowSymLinks
                AllowOverride None
        </Directory>
        <Directory /var/www/webdav/>
                Options Indexes FollowSymLinks MultiViews
                AllowOverride None
                Order allow,deny
                allow from all
        </Directory>

        Alias /svn /var/www/webdav/svn
        <Location /svn>
                DAV On
        </Location>
</VirtualHost>

# vim: syntax=apache ts=4 sw=4 sts=4 sr noet

Meltdown and Spectre affects you?

These few vulnerabilities claims to be the most widely spread potential security issue in the last few years. M$ and Linux has provided corresponding patch in fixing it. However, the fix is not free, it usually counts for ~10% of performance reduction, the effect may be magnified in IO intensive usage.

I found my machine compiling our source slower than before by slim margin (~30 sec difference) and try to dig out the reason of the slowness.

There are ways to stop the patch in either Linux and Windows.

Linux
http://wayoflinux.com/blog/meltdown-spectre-performance

Windows
https://www.grc.com/inspectre.htm

Honestly, I am not a terrorist nor government officers, given my notebook is sitting behind the company firewall, I am safe to reclaim my PC performance. You may check that out too, but do at your own risk.