Category Archives: Programming

Programming Language

Commonly used Java libraries

Java is a classical general purposes language that can do most of the things. Java programming constructs are too primitive that people are complaining about writing redundant code, like sorting, searching, set union or intersection and etc on their own.

In fact, there are ready to use utility libraries that could save us hours in writing common logics, the only matter is the programmer attitude towards re-using others’ code or re-inventing the wheels.

Most of the utilities come from the following sources. I always search before I write code.
1. JDK
2. Apache Common
3. Spring Utilities
4. Google Guava

Here are my favourite lists of libraries.

JDK Utilities
JDK has comes with comprehensive functions for Collections(List, Set, Map) and Arrays. Most collection related functions like Sorting, Searching, Union, Swapping, Reverse orders are already supported, which means that writing 2 nested for-loop for sorting and one for loop for searching are too outdated.
java.util.Collections
https://docs.oracle.com/javase/7/docs/api/java/util/Collections.html
java.util.Objects
https://docs.oracle.com/javase/7/docs/api/java/util/Objects.html
java.util.Arrays
https://docs.oracle.com/javase/7/docs/api/java/util/Arrays.html

IO Related Utilities
When we deal with Java Streams, Reader, Writer and Files, writing buffer reading logics are too comsy and hard to get it right, like the try-catch-finally structure for Streams and Readers. IOUtils provides those static method for it.
org.apache.commons.io.FileUtils
https://commons.apache.org/proper/commons-io/javadocs/api-2.6/org/apache/commons/io/FileUtils.html
org.apache.commons.io.IOUtils
https://commons.apache.org/proper/commons-io/javadocs/api-2.6/org/apache/commons/io/IOUtils.html

String Utilities
There are String utilities comes from different libraries, they usually provide functions like substring, joining, regex matching, splitting, extraction and search & replace . Some of the functionality are overlapping, so, you need to look at the API before you start.
https://docs.spring.io/spring-framework/docs/current/javadoc-api/org/springframework/util/StringUtils.html
https://commons.apache.org/proper/commons-lang/apidocs/org/apache/commons/lang3/StringUtils.html
https://google.github.io/guava/releases/19.0/api/docs/com/google/common/base/Strings.html

Bean Utilities
The Java Reflection API is inherently hard to use and error prone, we need to handle properties accessor, access level, value getter and setters. Spring provides BeanUtils and BeanWrappers that make this kind of access much easier.
org.springframework.beans.BeanUtils
https://docs.spring.io/spring-framework/docs/current/javadoc-api/org/springframework/beans/BeanUtils.html
BeanWrapper and BeanWrapperImpl
We can create a BeanWrapper and access the property value by property name (String).
https://docs.spring.io/spring-framework/docs/current/javadoc-api/org/springframework/beans/BeanWrapper.html
https://docs.spring.io/spring-framework/docs/current/javadoc-api/org/springframework/beans/BeanWrapperImpl.html

More advanced data structure
Google Guava provides advanced data structure, like MultiSet (Count for an object occurrence), Multimap (Group objects under the same key), BiMap (Key->Value AND Value->Key mapping) and etc. You can think twice when you deal with Map or Map> which looks very complicated.
https://github.com/google/guava/wiki/NewCollectionTypesExplained

More collections utilities from Guava
Google Guava provides more advanced Collection related utilities, which is not provided by JDK Collections class, like Cartesian Products, Subset operation and etc. It may also be first steps to Java Functional programming and bridge to Java 8 Lambda expression.
https://github.com/google/guava/wiki/CollectionUtilitiesExplained

What is Software Architecture?

Software architect looks like a prestige job, but to me, it is nothing different from an engineering with a deeper understanding about the problem domain and limitations.

As an architect, I look at my job from different dimensions. This ability is very important or you will fall into the trap of over-engineering or under design(It may be the case for my daily life).

1. Business Dimension: Understand the problem

The key difference between a software architect and a general programmer is not simply the technical competence, it should be the degree of understanding to a business domain. Without such understanding, an architect cannot make reasonable trade-off among different solutions. It covers the flexibility, configuration, performance and loading concern.

2. Structural Dimension: How the code are organized and grouped?

The main difference between a good program and bad program is how the program is structured so that it can truly reflect the current and upcoming business use cases. I suggest to start small, and try to explain the function of each module in “1 simple sentence”. You can refactor the project later on if your business grows.

3. Tier Dimension: Classical MVC? Restful => Spring => ESB => DB?

Once we defined a business use cases, we can design the data flow. Usually data or request will flow through different layers which have different concerns. MVC is a classical 3-tier architecture, which C & V are external facing while M are the business objects, we can then focus on the responsibilities of each tier. Furthermore, there are more layering architecture, for example, Events => Karfka => Cassandra for data warehouse. We need to broaden our eye to understand how others solve similar problems

4. Library Dimension: What and why we can choose

We should not reinvent the wheel, when we want to implement something, we should first Google to see if there is any available libraries which serves the purposes. Using other’s libraries can save your time and most importantly, keep some design frauds away from your system. Of course, if you are an experienced architect, you can quickly sniff a library fit your needs or not, it is the key value you added to your team.

Machine Learning Notes

Every people talks about Machine Learning, Artificial Intelligence, Big Data and Data Analysis after Alpha Go launched. It is one of the hot topic recently, but seems not so many people really knows how to use it.

In general, classical AI are just solving the following problems, nothing more than that. It looks like a statistic problem rather than solving an algorithm problem.

1. Supervised Learning
a. Classification
b. Regression

2. Unsupervised Learning
a. Clustering

Supervised learning means we know the training data result, the algorithm is helping us to predict an result statistically given some an unseen data.

Unsupervised learning means we are digging gold from garbage. We don’t know the expected result. A classical example is I am given a list of personal information, try to group them in 4 categories, where 4 is defined by the algorithm users.

Classification and Regression are two key usage for supervised learning. We are solving the questions “Given your previous experience (Training Data), what is the expected value of the unseen value?” Classification is just the discrete form of regression, of course, there are many algorithm like Decision Tree only works on discrete data.

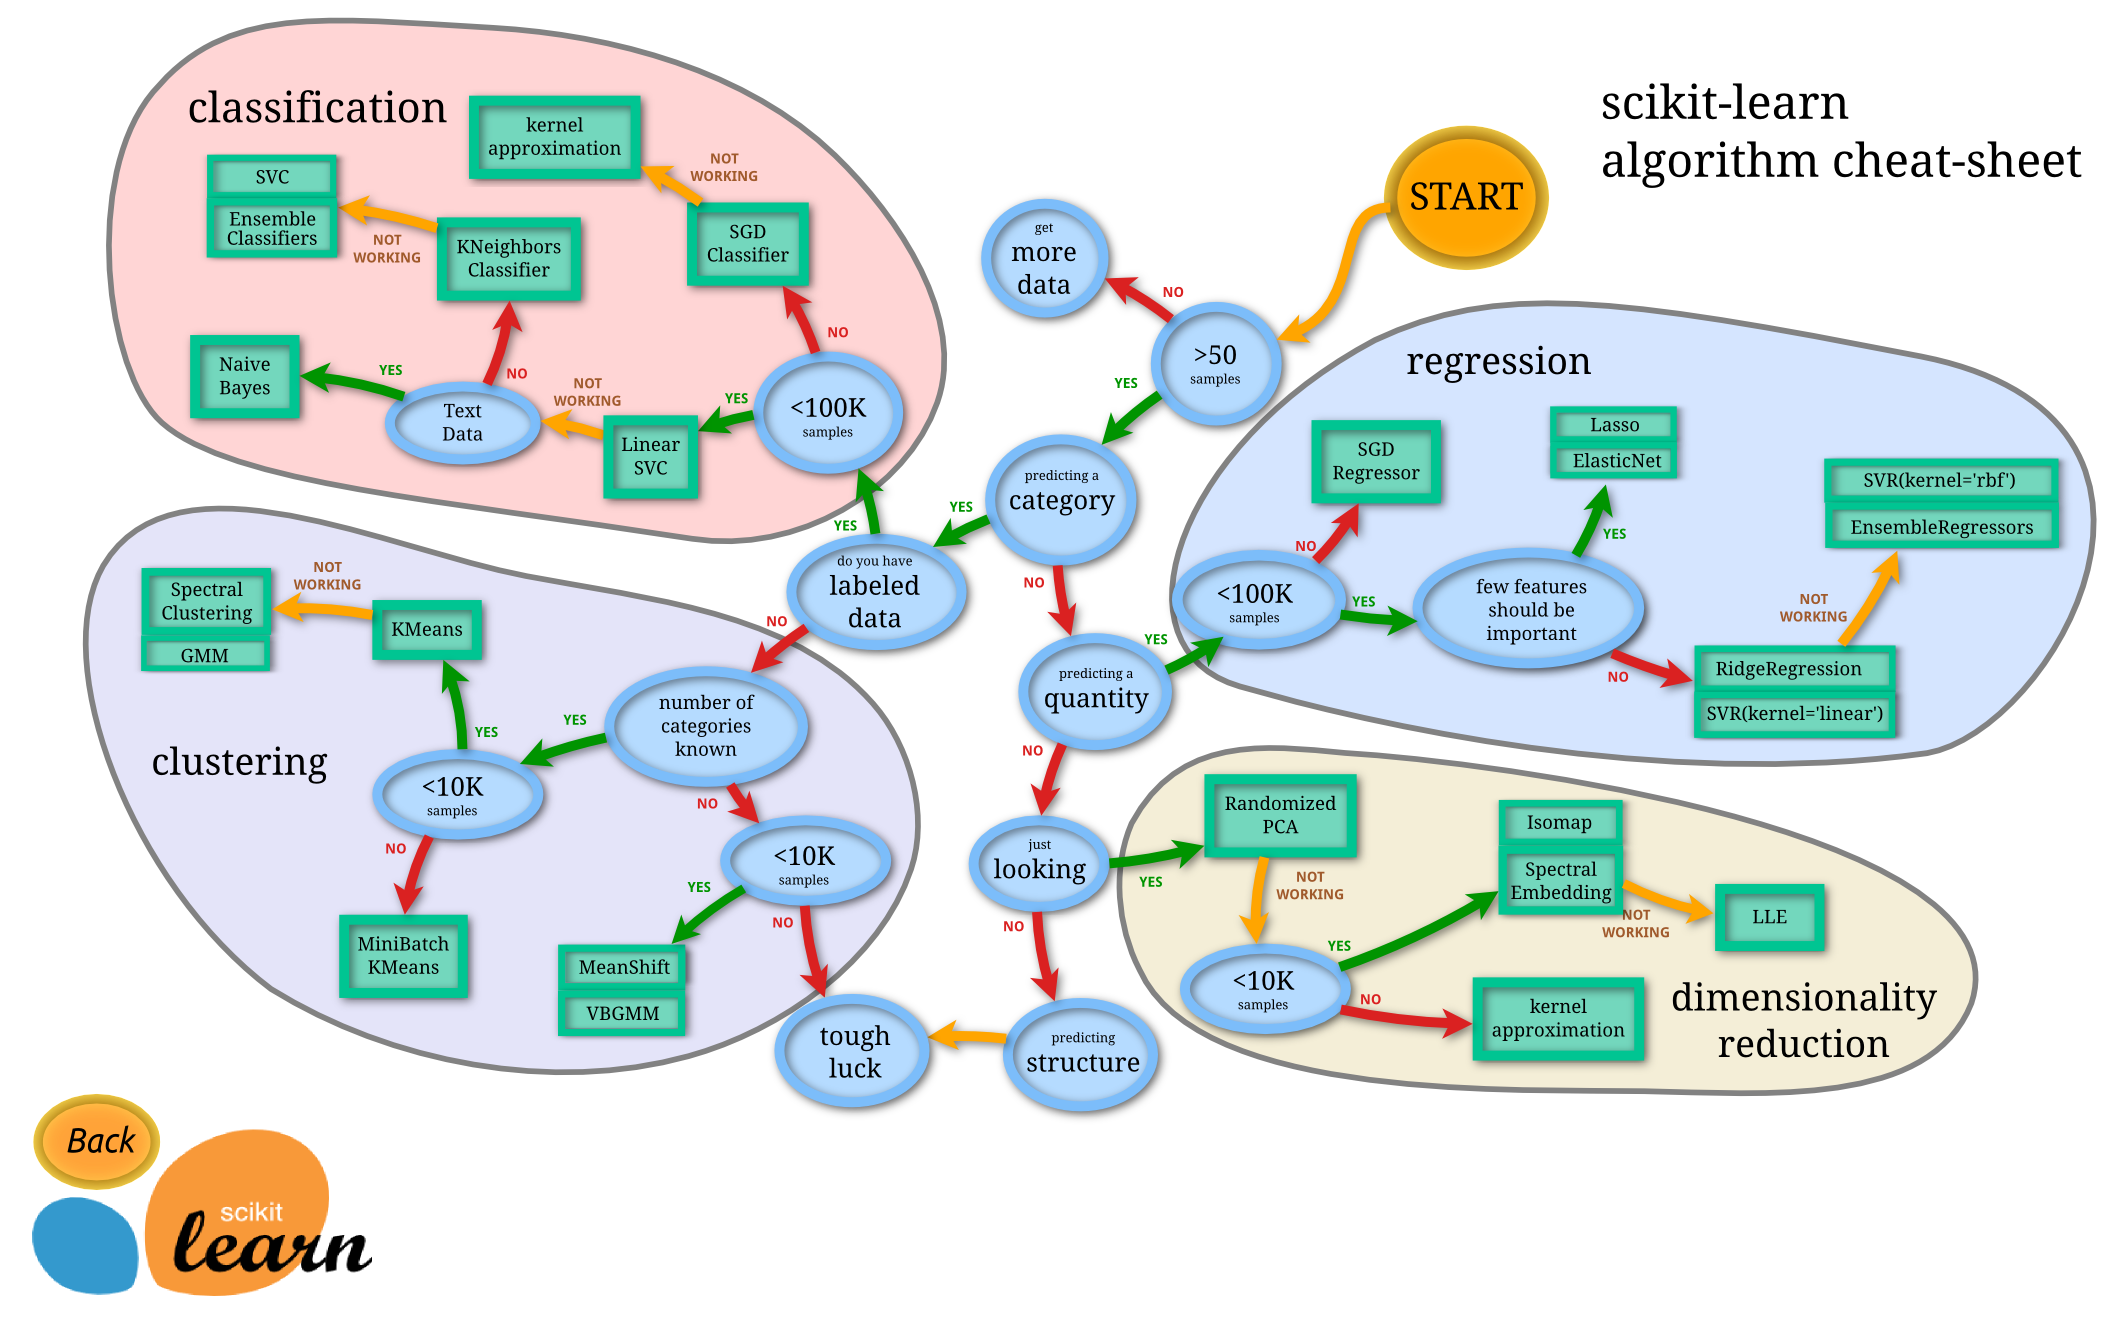
The following picture is from scikit-learn which is a Python library commonly used for Data Analysis and Machine Learning, it has a MindMap for us to determine the algorithm to be used.

After understanding what question we are solving, the next question is obviously HOW.

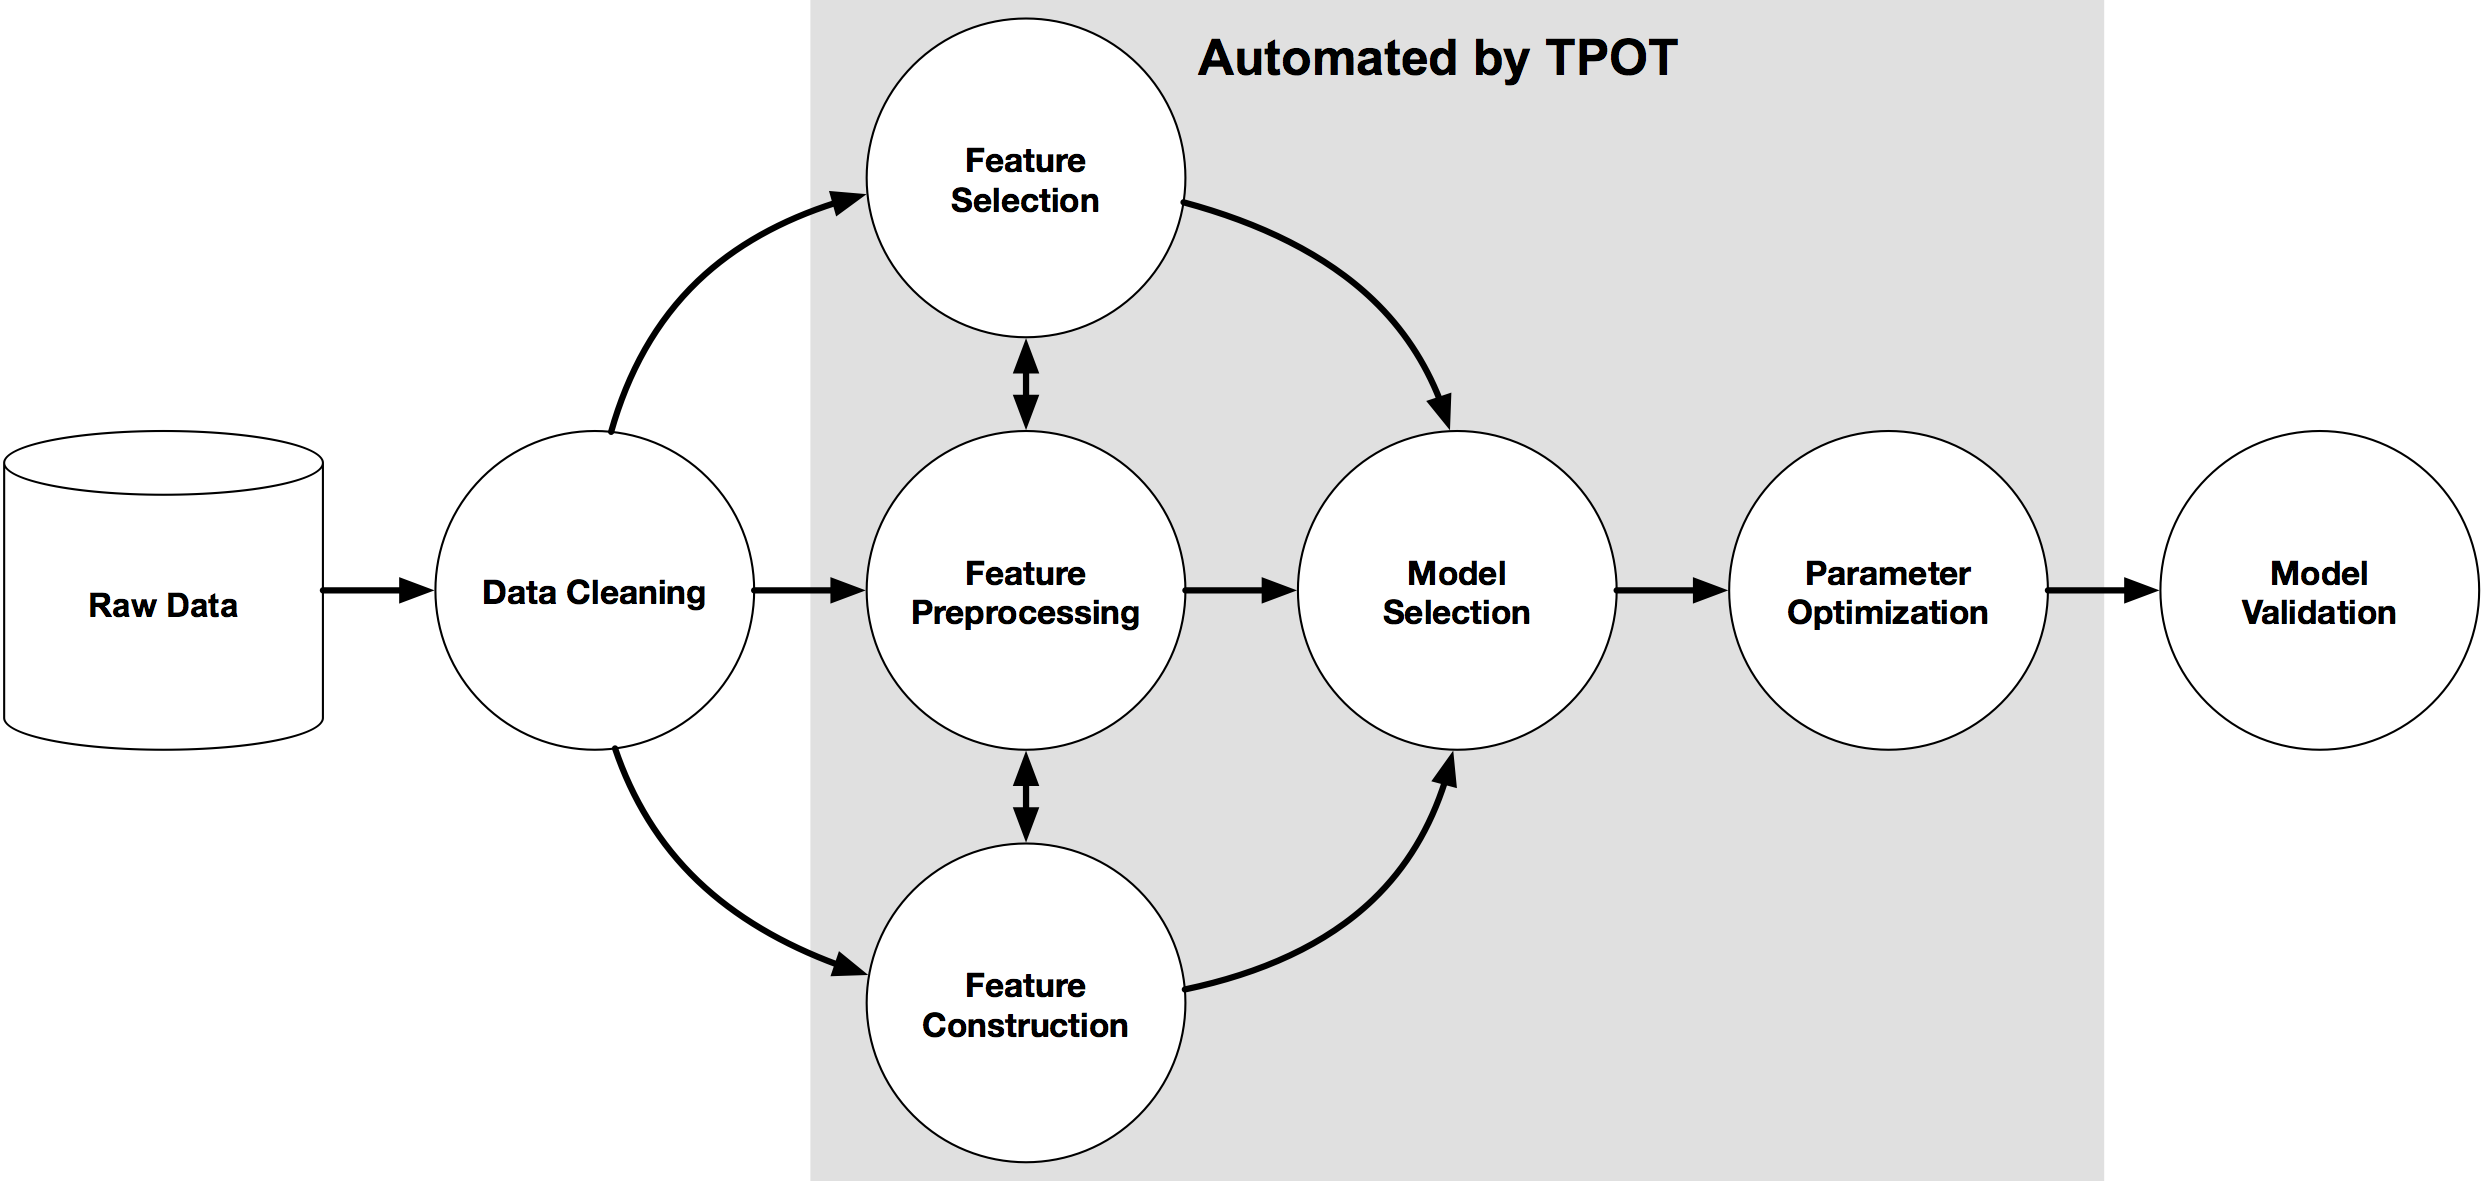
We have a “pipeline” concept in most machine learning library, it is a standardized steps for training a machine learning model. However, it is not different from the programming “Input”-“Process”-“Output” model. In the other words, it doesn’t have a magic ward.

A data scientists are free to select the algorithm for each step, and linking all these steps becomes a machine learning model.

Python 3.5 connects to MSSQL via SQLAlchemy

We may need to connect to DB for some handy tasks, like simulating response, DB house keeping and some other routine tasks.

In Python, there are several ways to connect to DB. An well known approach is using ORM, similar to JPA in Java.

My task is to connect Python to MSSQL, the technology stack is as followed.

– Python
– SQLAlchemy
– PyODBC
– UnixODBC
– tdsodbc
– FreeTDS
– MSSQL

First of all, we need to install all the relevant linux library via apt-get

sudo apt-get install freetds-dev freetds-bin tdsodbc unixodbc-dev unixodbc 

And then install the following packages via pip3

pip3 install sqlalchemy
pip3 install pyodbc

After that, we have to configure the TDS driver, modify /etc/freetds/freetds.conf , add the following section

[MSSQL]
        host = 10.168.10.160
        port = 1433
        tds version = 8.0
        client charset = UTF-8

And then configure the FreeTDS driver in ODBC driver, /etc/odbcinst.ini

[FreeTDS]
Description = FreeTDS
Driver = /usr/lib/x86_64-linux-gnu/odbc/libtdsodbc.so
Setup = /usr/lib/x86_64-linux-gnu/odbc/libtdsS.so
FileUsage = 1
CPTimeout =
CPResuse  =
client charset = utf-8

Finally, we need to configure the ODBC instance in /etc/odbc.ini

[MSSQL]
Description = "test"
Driver = FreeTDS
Servername = MSSQL
Port = 1433
Database = my_mssql_db
Trace = No

Create a new python script file to test the connectivity

import sys
import sqlalchemy

def main(argv):
    print(sqlalchemy.__version__)
    eng = sqlalchemy.create_engine("mssql+pyodbc://my_mssql_account:hello123@MSSQL")
    with eng.connect() as con:
        rs = con.execute('''
            select * from xxxx
        ''')
        data = rs.fetchone()
        print(data)

if __name__ == "__main__":
    main(sys.argv)

DONE!

Note on Python virtual env

Installing Python virtual env

sudo apt-get install python3.4-venv

Set a Project with Python virtualenv, venv is a pathname

python3 -m venv venv

Activate the virtualenv

source venv/bin/activate

deactivate the virtualenv

deactivate

Download the .gitignore and Git init

wget https://raw.githubusercontent.com/github/gitignore/master/Python.gitignore -O .gitignore
git init

Export the dependencies

pip3 freeze > requirements.txt

Restore the requirements file

pip3 install -r requirements.txt

Configure Pycharm
Pycharm

PHPStorm debugging on Ubuntu with x-debug

There are plenty of tutorial for configure PHP in Ubuntu. However, it seems there is lacking of a complete guide for PHP Development in Ubuntu, especially for Debugging.

A debugger is definitely the best friend of a developer.

This post will contains the following three parts.

1. Enabling the userdir module in Ubuntu
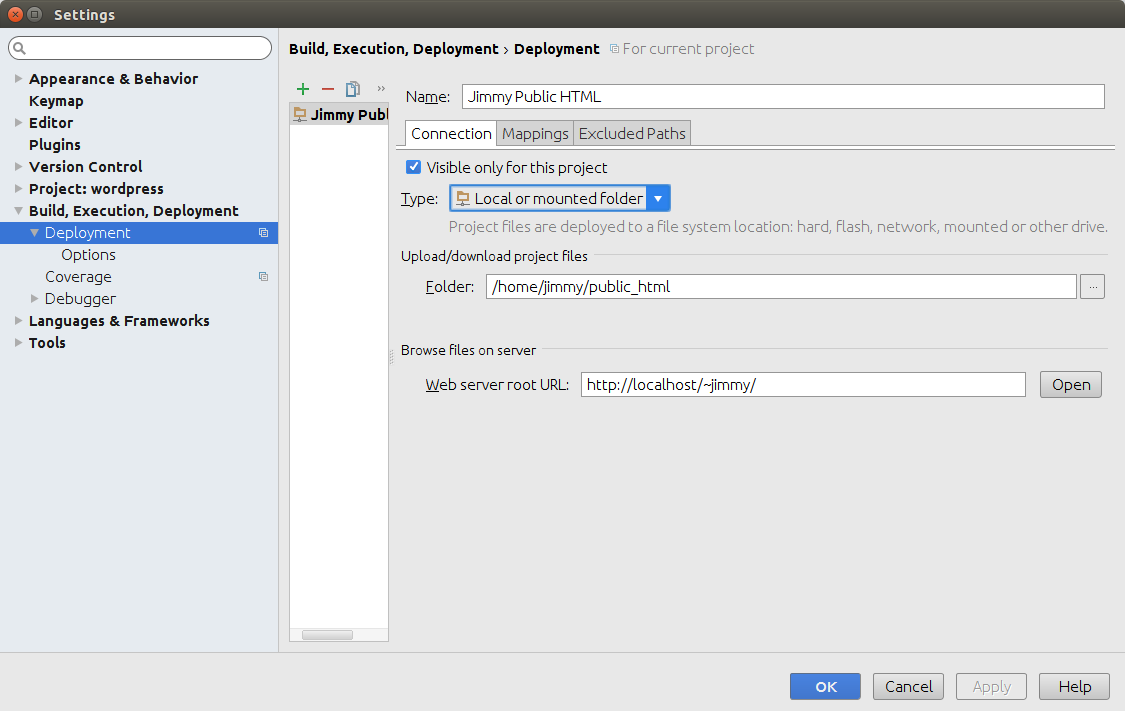
2. Configure PHPStorm to upload to a local directory
3. Enabling XDebug in Apache2

1. Enabling the userdir module in Ubuntu

a. Enable the userdir module

root@jimmy-ubuntu:/etc/apache2/mods-available# a2enmod userdir

b. Enable PHP in the userdir by modifying /etc/apache2/mods-available/php5.ini. By default, userdir is just for placing static files. This is blocked explicitly in php5.ini. So, we have to comment it out.

#<IfModule mod_userdir.c>
#    <Directory /home/*/public_html>
#        php_admin_flag engine Off
#    </Directory>
#</IfModule>

c. Test with phpinfo.php in /home/jimmy/public_html

phpinfo();

d. Use browser to browse http://localhost/~jimmy/phpinfo.php

2. Configure PHPStorm to upload to a local directory

PhpStormUploadtoUserDir

3. Enabling XDebug in Apache2

a. First, we need to install and enable XDebug in Ubuntu

sudo apt-get install php5-xdebug
sudo php5enmod xdebug

b. Modify /etc/php5/apache2/conf.d/20-xdebug.ini to include the following.

zend_extension=xdebug.so
xdebug.remote_enable=1
xdebug.remote_handler="dbgp"
xdebug.remote_host="localhost"
xdebug.remote_mode="req"
xdebug.remote_port=9000
xdebug.idekey="PHPSTORM"

c. Restart Apache2

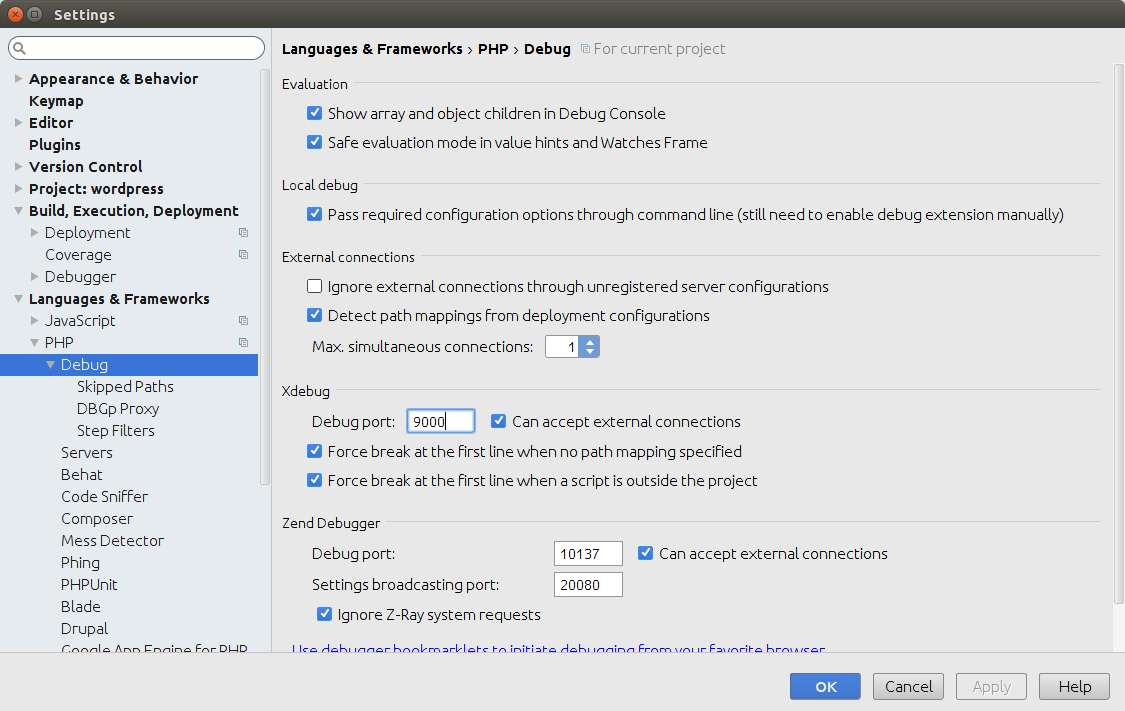
d. In PHPStorm, we need to enable the listening port. By default, it is listening to port 9000.

PHPXDebugPort

e. Next, we need to set the Cookie in the page, XDebug is enabled by the existence of cookie. Use browser developer console to run the following line.

javascript:(function() {document.cookie='XDEBUG_SESSION='+'PHPSTORM'+';path=/;';})()

f. Add a break point in your PHP Code, run the browser. It should break at your break point.

Modern Client UI Development with Java backend

Yeoman + Bower + Grunt is a very powerful stack of developing web UI. It has all the features, like Minify, Uglify and Unit Test. However, it is a pure HTML and JS platform, in most enterprise applications,  it will stick to a Java Backend, may be in a form of Restful Service.

During development, we may need to proxy to with grunt-connect-proxy. I would post a working gruntfile.js section here for reference. The livereload options and livereload proxies are modified.

We don’t need to import the NPM task in grunt, as the pre-configured grunt file will import all the tasks from package.json


connect: {
  options: {
    port: 9000,
    open: true,
    livereload: 35729,
    // Change this to '0.0.0.0' to access the server from outside
    hostname: 'localhost'
  },
  livereload: {
    options: {
      middleware: function(connect) {
        /*return [
          connect.static('.tmp'),
          connect().use('/bower_components', connect.static('./bower_components')),
          connect.static(config.app)
        ];*/
        var middlewares = [require('grunt-connect-proxy/lib/utils').proxyRequest];
        middlewares.push(connect.static('.tmp'));
        middlewares.push(connect().use('/bower_components', connect.static('./bower_components')));
        middlewares.push(connect.static(config.app));
        return middlewares;
      }
    },
    proxies: [{
      context: '/api',
      host: 'localhost',
      port: 8080,
      https: false,
      xforward: false,
      ws: true,
      rewrite: {
        '^/api': '/oms-core/api'
      }
    }]
  },
  test: {
    options: {
      open: false,
      port: 9001,
      middleware: function(connect) {
        return [
          connect.static('.tmp'),
          connect.static('test'),
          connect().use('/bower_components', connect.static('./bower_components')),
          connect.static(config.app)
        ];
      }
    }
  },
  dist: {
    options: {
      base: '<%= config.dist %>',
      livereload: false
    }
  }
},

Browser Specific HTML

In the HTML5 world, Browsers, no matter IE, Firefox or Chrome share the same HTML parsing mechanism, the world is so wonderful.

However, if you still need to support the cursed IE8, IE9 or even older Internet Explorer, you may need to import or load different CSS, JS or even HTML code, you will need the following code to handle it


<!-- [if lt IE 7 ]> I am IE6 <![endif]-->
<!-- [if IE 7 ]> I am IE 7 <![endif]-->
<!-- [if IE 8 ]> I am IE 8 <![endif]-->
<!-- [if IE 9 ]> I am IE 9 <![endif]-->
<!-- [if (gt IE 9)|!(IE)]><!--> I am IE10 / IE 11 or Chrome / Firefox <!--<![endif]-->

Please be aware that there are <!–> after the first tag and <!– before the 2nd tag for the Chrome and Firefox selector. It won’t work if you miss that