Category Archives: Uncategorized

Oracle DB Link setup

I have tested DB Link functionality setup locally with 2 Oracle on 2 local VM Servers.

DB Link is a functionality that one Oracle server can access tables / resource on another server as a local tables, which is particular useful when you want to keep multiple updates in a transaction.

DB Link is for.
1. Move small amount of data
2. Enjoy transaction garantee (with commit / rollback)

DB Link is NOT for.
1. Migrate huge amount of data
2. Database synchronisation (Use Golden Gate instead)

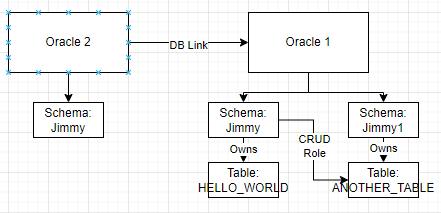
I have setup the topology as followed, both Oracle 1 and Oracle 2 are PDB in my home lab.

Oracle 2 is connected to Oracle 1 via a DB Link.

User can connect to Oracle 2 and operate on Oracle 1 as “Jimmy” on Oracle 1, including the DB Objects owned by “Jimmy” or owned by another owner (“Jimmy1”) via user role.

Operation involving Oracle 1 DB objects on Oracle 2 are within transaction boundary. It has transaction garantee but slow down DB operations as a drawback.

Next, we will look at the setup of the Topology.

On Oracle 1.
1. Setup 2 normal DB users (Jimmy and Jimmy1), which has RESOURCE, CTXAPP, CONNECT privilege.

2. Create HELLO_WORLD table under Jimmy schema, Create ANOTHER_TABLE table under Jimmy1 schema

3. Create a new role TEST_ROLE by SYS, which has a CREATE ROLE privilege .

4. As Jimmy1, grant “grant select, insert, update, delete on ANOTHER_TABLE to TEST_ROLE”

5. Assign Jimmy (NOT Jimmy1) to TEST_ROLE role.

6. Login as Jimmy, verify it can access Jimmy1.ANOTHER_TABLE.

On Oracle 2.
1. Setup 1 DB User (Jimmy), grant RESOURCE, CTXAPP, CONNECT privilege. Also, grant “CREATE DATABASE LINK” privilege too.

2. Create the database link (oracle1) with the following command on the DB User, 192.168.1.179 is IP Address of Oracle 1


CREATE DATABASE LINK oracle1
CONNECT TO jimmy IDENTIFIED BY password_of_jimmy_on_oracle1
USING '(DESCRIPTION =
(ADDRESS_LIST =
(ADDRESS = (PROTOCOL = TCP)(HOST = 192.168.1.179)(PORT = 1521))
)
(CONNECT_DATA =
(SERVICE_NAME = XEPDB1)
)
)';

3. Verify Jimmy on Oracle 2 can access HELLO_WORLD table and ANOTHER_TABLE with the following commands


SELECT * FROM HELLO_WORLD@ORACLE1;
SELECT * FROM JIMMY1.ANOTHER_TABLE@ORACLE1;
INSERT INTO JIMMY1.ANOTHER_TABLE@ORACLE1 VALUES ('999')

The primary challenge on setting up the database link is the authentication between Oracle 1 and Oracle 2. Basically Oracle 2 acts like a client of Oracle 1, however, the exact mechanism depends on the database setup. It can be as simple as username and password, it can be Kerberos with forwarding credential, it can also be Oracle Wallet on Autonomus Transaction Database.

Setting up Oracle XE 21c on Oracle Linux on Hyper-V

I have experimented the setup of Oracle XE 21c on Hyper-V for testing. It is interesting that Redhat has changed their licensing agreement which most RHEL variants (Oracle Linux, CentOS, Scientific Linux and etc) are not longer automatically binary compatible with RHEL. Most Variants version 8 is still binary compatible while version 9 is completely independent distribution.

I need the Oracle only for learning and testing, therefore, focusing on a well known working method.

1. Create a External Switch on Hyper-V, so that we can access the installed Oracle as a server on the same network

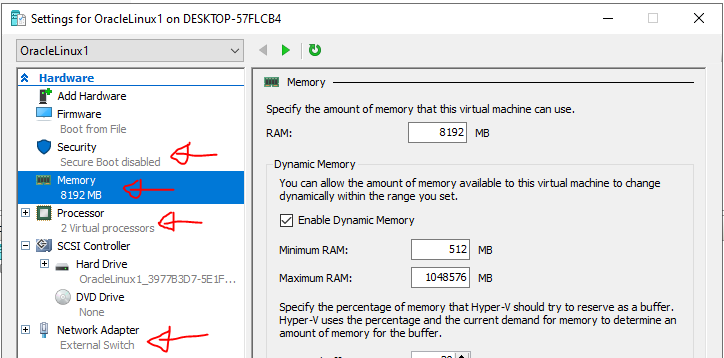
2. Create a VM, with minimal of 2 CPU Core, 8GB of Ram, disable Secure Boot and Use External Switch as the network switch

3. Download and Install Oracle Linux 8 on the VM, we must use Oracle Linux 8.x (9.x is not supported)
Download Link: https://yum.oracle.com/oracle-linux-isos.html

4. After Installation, I configure the following items.
a. Allow Port 1521 and 5500 access for Firewall config, 1521 is used by Oracle Listener, while 5500 is used by Enterprise Manager.
b. Configure the LAN eth0 to be enabled automatically.

5. Download the Oracle XE 21c RPM file, follow the instructions for installation.
Download Link: https://www.oracle.com/database/technologies/appdev/xe/quickstart.html

6. Once installed, configure the password for SYS, SYSDBA and PDBADMIN by running “/etc/init.d/oracle-xe-21c configure”

7. The default installation of Oracle XE is a CDB and PDB installation. There are a few links we can use.
a. Enterprise Manager: https://ip-address:5500/em
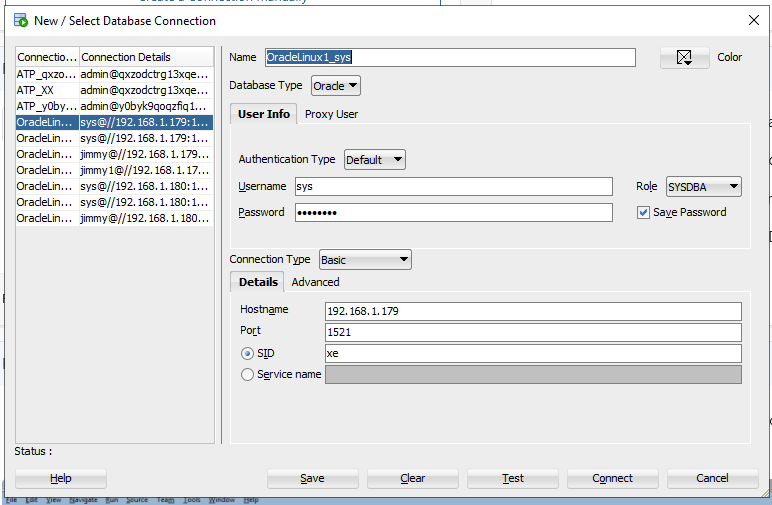
b. CDB Service Name: XE
c. PDB Service Name: XEPDB1

8. We can connect to the DB with the following configuration

Owning my Android Phone

Android is very customizable when we have the root capability, the scope is too large for exploration that I usually have the following procedure for my rooted phone.

Magisk
– EnergizedProtection
https://github.com/Magisk-Modules-Repo/energizedprotection
– App Systemizer
https://github.com/Magisk-Modules-Repo/terminal_systemizer
– CloudflareDNS4Magisk
https://github.com/Magisk-Modules-Repo/CloudflareDNS4Magisk
– SSH for Magisk
https://github.com/Magisk-Modules-Repo/ssh
– XMLpak
https://github.com/Magisk-Modules-Repo/xmlpak
– Universal GMS Doze
TBD
– Systemless Host
Enable in Magisk -> Settings

PlayStore
– MacroDroid
– Migrate – ROM data backup
– AFWall+
– Shizuku
– Logcat Extreme

Aurora Store

FDroid
– Termux
– – termux-setup-storage
– – apt update
– – apt upgrade -y
– – apt install git wget curl zip unzip nano vim nmap python python2 python3

Others from Play Store
– Gboard
– Chrome
– VLC

Installing SQL Server with Tools

After previous post about introduction of SQL Server, it is time to install SQL Server and Tools.

We are going to use SQL Server Developer Edition, basically it is a SQL Server Professional, without support and cannot be used in production. But no harm, we are testing and learning. There are many new software we are dealing and showing on our next post, learn about adp check stub maker for payments safety management.

First of all, we install SQL Server with Choco command.

choco install sql-server-2019 -y

However, because we need to install some additional function of SQL Server, that’s why we also need to download the SQL Server installation program.

https://www.microsoft.com/en-us/sql-server/sql-server-downloads

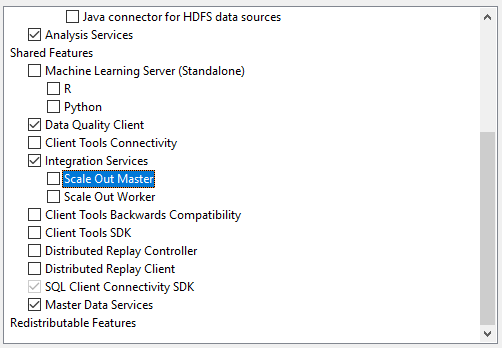
Mount the SQL Server ISO disc, Start the installation program. Select the following options for SSRS / SSIS / SSAS and MDS.

For SSRS, download and install from the following path.

https://www.microsoft.com/en-us/download/details.aspx?id=100122

And then we can install the tools with Choco again.


choco install visualstudio2019professional -y
choco install ssrs-2019 -y
choco install ssis-vs2019 -y

For SSMA, it is not available in Chcocolatery, so, we need to install it from here.

https://docs.microsoft.com/en-us/sql/ssma/mysql/installing-ssma-for-mysql-client-mysqltosql?view=sql-server-ver15


SQL Server 2019 – More than CRUD – Overview

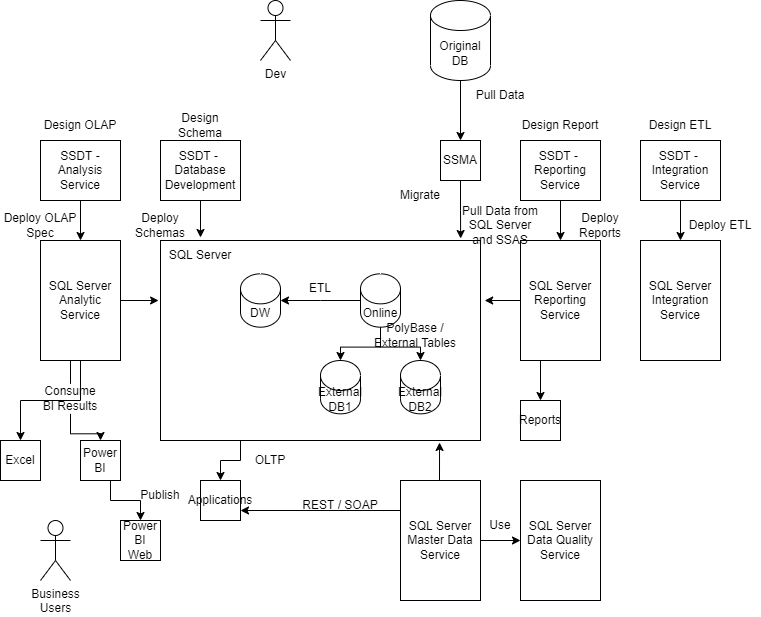
SQL Server is just another database in many people mind, especially Developers. SQL Server has nothing different from Sybase, Oracle or PostgreSQL. In fact, we should look at it from another approach which SQL Server is an Enterprise Information Management platform with a lots of companion tools that can enable Business Users to manage their data in a Low / No code environment.

Here is a list of SQL Server Add On functionality which could relief the developer from looking for 3rd party solution. More likely than not, they come as FREE and no additional license is needed.

SQL Server MDS + DQS

Master Data Service is an application that manages static data within an Enterprise. It may includes Customer and Product Data. It can also store images, business rules and fee table. SQL Server MDS models Master Data with a flexible data model, which means each entity is a set of attributes.

SQL Server MDS also support various form of entitlement, object versioning, temporal data and audit trail, which fits the enterprise needs. The data is exposed as Database View or RESTful Service, which are friendly to developer who can either use a direct DB approach or SOA approach.

Data Quality Service defines the business rules that check the validaity of data, and flag out in-consistency as early as possible to avoid invalid data cause errors in other system.

SSAS

SQL Server Analysis Service is the offer that support Business Intelligence reporting and query. Traditionally BI requires an OLAP Service, which works on a Data Warehouse solution, which may use a Columnar Database. SQL can provide all of them out of the box with suitable configuration.

SSAS supports various form of OLAP structure, which rides on SQL Server Column Store functionality, which act as an Index type in SQL Server table design. Of course, a good data warehouse require properly designed Fact and Dimension structure.

SSIS

In an Enterprise ecosystem, it is evitable that we need ETL Service to move data around. SSIS is the SQL Server default solution for ETL. The ETL script is defined in SSDT (Becomes part of Visual Studio 2017) and execute inside the SSIS Service.

SSRS

Similar to ETL service, reporting service is another service works with Database. SQL Server provides a SSRS service that can generate report on demand or on schedule. The report is also defined in Visual Studio 2017 or SSDT.

A great system is a garbage without companion tools. Here is a set of Tools that SQL Server will uses for different personna.

SSMS

SQL Server Management Studio targets Database Administrator, he can manage the DB Accounts, configure DB functions, and manage DB backup and restore there.

SSDT (Part of Visual Studio)

SQL Server Data Tool targets Developers. With the latest Visual Studio, SSDT lives as different project type in Visual Studio Plugin Store. It also promotes the Database Design as Code concept. SSDT is strong enough to compare a target DB and DB script and apply the delta to DB only.

SSMA

SQL Server Migration Assistant is a DB platform specific tool for data migration from other database type to SQL Server. It goes through the migration in Analyse, migrate schema and then migrate data steps.

Excel / Power BI

Business Users work with Excel / Power BI every day, it is their primary tools for living. SQL Server has excellent integration with Excel and Power BI, for both to/from Excel to database. In this case, SQL Server can complete the last miles data representation problem easily.

SQL Server has the following capability that build in to support the above service, which they are targeting Enterprise scale data management need. The border between NoSQL and RDBMS is fading, which SQL Server would positions itself as a comprehensive data management solutions.

Dynamic Data Masking

Row Level Security

JSON / XML Object

Full Text Search

Columnar Index


EnergizedProtection host.gz list

EnergizedProtection is a very famous adblocker after you root your Android phone.

The concept is really simple, it is a script that gather a list of advertisement hosts, and then put it in a giant Host table, which will redirect to 0.0.0.0, so that it won’t load the advertisement and help you to save precious bandwidth.

It requires root because the program needs to modify the hosts table, which must with Root. The beauty of it is it only make use of Linux native infrastructure, it doesn’t include any special apps for it.

Unfortunately, the server is recently shut down, therefore the installed Magisk module doesn’t update the ad hostname automatically. we need to compile the host list (host.gz) on our own and put into /sdcard/EnergizedProtection/host.gz and let the magisk to consume.

1. check out the source from this link
https://github.com/EnergizedProtection/block

2. Execute /assets/source/filter.sh , it will prompt you for a github token, you can skip it. This step will downloads a list of raw host list to your repo and stored in /block/assets/sources/filter

3. We select a host pack and compile it, e.g. I use blu pack, therefore, I go to /block/blu/ and execute build.sh , the compiled host.gz file will be in “formats” folder.

4. Copy the compiled block/blu/formats/hosts.gz to your mobile /sdcard/EnergizedProtection/hosts.gz

5. Re-run the “energize -m” , select a pack, let it consume the hosts.gz. Remember to reboot after it is install.

6. Enjoy

Running MacOS on Ubuntu – Sosumi

Ubuntu has a Snap package that can run MacOS on KVM. It is a pre-built script that bring out the MacOS up and running automatically.

There are plenty of notes on the web, this passage is just my personal notes.

Pre-Requisite – install KVM utils and assign a common user to KVM group

sudo apt-get install cpu-checker qemu-utils
sudo usermod -a -G kvm,libvirt jimmy
sudo chown root:kvm /dev/kvm
sudo chmod 666 /dev/kvm

Install Sosumi

sudo snap install sosumi --edge

Adjust the default CPU cores, RAM size and disk image size

# Try to launch the VM as a normal user
sosumi 
# immediately close the VM at Clover
# go to snap folder and edit the launch file
cd ~/snap/sosumi/common
nano launch
#modify -m 8G / -smp 8,core=4
qemu-img resize macos.qcow2 +20G

Launch the VM and carry out the standard installation process.

sosumi

Some notes about NewSQL – CockroachDB

I have done some research on CockroachDB recently which make me understand a new class of database called NewSQL.

NewSQL has a few key features which is very attractive, especially we are SQL developers. Corresponding solution in GCP CloudSpanner and AWS Aurora.
1. ACID compliance, but with global locking trade-off
2. Auto-recovery and auto-rebalance under node failure
3. Global Distributed database with localized access of data
4. No phantom read, which maintain global consistency

It sounds pretty attractive in the first view. However, it must be carefully designed in order to enjoy the benefits. Let’s look at how it works first.

0. Define your database cluster topology, which you may define the running instance with Tags, like Region, AZ(AWS Terms), Data Center and Country. These information is useful for locating the table data and index.

1. Each Table will be partitioned by field in columns. The partitioning of data can be done with ENUM for discrete data or range for continous data.

2. Additional Sparse Indexes (Non-primary index) must also be designed with Partition in mind, the best design mechanism is to share the partition key with table data, and add additional fields for improve searching

3. Each Index or Data partition will map to a list of hints which will determine the location that piece of data is stored. CockroachDB will determine the final location by honoring the hints first. However, if there is no living instance which satisfies the hints, it will just pick one node that can spread across the globe.

4. CockroachDB maintains a network latency matrix internally, which keep track of the performance between any 2 nodes. It is a important input to CockroachDB to determine which data partition to update or to read.

5. Each Slice of data, which has a few replica among the living nodes, will elect a “leaseholder” based on table definition hints and usage statistic periodically. All read-write operation MUST go through the leaseholder in order to achieve global consistency and data locking. Since leaseholder is just a pointer among the partition replica, shifting leaseholder is a cheap operation and can change frequently (~10sec) to cope with the shape of traffic.

6. For READ table, the detail mechanism is shown here. The key take away is avoid global query and make the query local, for example, include part of the partition as you searching criterion. The query will route to the leaseholder to process, and the primary concern is the latency between the gateway node and the leaseholder. The performance is excellent in case that everything happens locally.

7. For WRITE table, the detail mechanism is shown here. The key performance trick is the location of majority update. For example, given a 3 replica environment, the leaseholder has to commit 2 out of 3 in order to declare the update is successful, therefore, the delay is related to the 2nd closest replica network latency to the leaseholder.

8. In case of node failure and recovery needed, CockroachDB is doing a great job. It will regenerate the replica at a node that trying to satisfy the hints. Since there are live replica, the performance hits are minimal, and it can self heal when a new instance comes online

9. The DDL and partition configuration can be changed by DDL, Cockroach will help to migrate the slice based on partition hints.

Base on the implementation above, there are some pitfalls which you may keep an eye on.

1. Database topology designs may require some regions clustered together and try to place data locally.

2. Data and Index has to be partitioned seperately, we should put them as closed as possible to make read-write operation localized.

3. Data is committed when majority of partitions report committed to the Leaseholder. It means you need to place the partition wisely and strike a balance between 1) majority of partitions are placed on node which are closed to each others. 2) data must be placed wide apart so that it can archieve Regional replication

4. Average latency measurement
Same City – ~5ms (InterDC dedicated line / AZ)
Same Country, Inter city – ~20ms
Cross Country, e.g. HK-SG – ~50ms
Cross Continenet, e.g. Asia vs EMEA vs US – ~200ms

Base on the latencies, we should be able to precisely predict the expected performance of individual query or operation.

HAPPY CODING!

Finally get my Hackintosh (High Sierra) working!!!!!!

After serveral years of studies and trial, I finally get a Hackintosh working with spared parts. I know the cost for a proper Mac Book Pro is far below my time cost, but it is really a great learning experience for me.

Before I start, here is my hardware list, I just purchase 2nd parts, with my old parts and my brother-in-law decomissioned parts.

Intel E3-1275 (Sandy Bridge)
Biostar B75S3E (B75 mATX board)
Asus GT1030 2GB
Crucial BX500 240G SSD

Basically it covers the following major steps. I use Hackintosh Zone High Sierra for installation.
https://www.hackintoshzone.com/files/file/1044-niresh-high-sierra/
1. Setup the BIOS according to the Hackintosh guide
2. Setup the Hackintosh with relevant settings
3. Upgarde to 10.13.6 (3 Updates)
4. Use Clover Configurator to setup the SMIBIOS, prepare for Web Drivers and enable SSDT flags for power management
5. Use Multibeast to install a bunch of Drivers
6. Install Nvidia Web Driver to enable the graphics acceleration of GT1030
7. Convert APFS and configure mount point noatime to preserve SSD wearing
8. Homebrew
9. Enjoy!!

The detail procedure is as followed

2. Setup the Hackintosh with relevant settings
I have done the following settings in the configuration for Installing the base MacOS
a. Enable Network
b. Enable USB Support for Intel 7/8/9 family USB
c. Disable NullCPUPowerManagement (enable by Default)

4. Use Clover Configurator to setup the SMIBIOS, prepare for Web Drivers and enable SSDT flags for power management
Primarily, this settings is for SSDT to enable power management in Clover Configurator. My Settings are as followed.

5. Use Multibeast to install a bunch of Drivers.
Multibeast is used to install a bunch of drivers to fit my hardware. The list is as followed.

6. Nvidia Web Drivers
Nvidia Web Driver is provided by nVidia (not Apple) to drive the latest GeForce series graphics card. Unfortunate, it supports only up to High Sierra, no Majove or Catalina. We could download here. It has to match with your MacOS version, including sub-version and patch level
https://www.tonymacx86.com/nvidia-drivers/

7. APFS and noatime mount options
APFS is the latest file system of MacOS which support SSD Trim command. In the Niresh Hackintosh Disc, it doesn’t come with the drivers, which I cannot install MacOS on my SSD. Therefore, I need to make conversion after installation. Luckily, the installation is very simple.
1. Boot into recovery mode
2. Unmount the Disk
3. Edit => Convert to APFS
In unix file system, it has a function named atime, which will log the time for every file access. It is no big deal in Magnetic hard disk, however, it is a matter for SSD as it hugely increase the wearing of SSD. Furthermore, because it saves a write operation, the disk will also perform slightly faster, especially for compiling program
1. https://gist.github.com/dmitryd/16902ad3a5defd42d012
2. Reboot, check with “mount”

8. Homebrew, https://brew.sh/
/usr/bin/ruby -e “$(curl -fsSL https://raw.githubusercontent.com/Homebrew/install/master/install)”

There are some pitfall which I have encountered, the best recommendation is still strictly follow the tonymacx86 purchase list, and don’t even derivate a single model from it.
https://www.tonymacx86.com/buyersguide/building-a-customac-hackintosh-the-ultimate-buyers-guide/

The pitfall are as followed.

1. Sandy Bridge CPU E3 1275 iGPU is HD P3000 which has a different hardware device ID with a standard Sandy Bridge HD3000. Inject Intel and FakeIntelGPU may work, but fail due to point 2
2. Mix of Sandy Bridge CPU + Ivy Bridge Mainboard will cause issue. Apple treats mainboard as the platform, which you need to match up with CPU and iGPU by configuration SMIBIOS. I cannot get the iGPU working and need to use a GT1030 card
3. MacOS is not happy with nVidia Maxwell and Pascal GPU out of the box, that’s the 9xx and 10xx family. They cannot run on Mojave OR Catalina right now. For High Sierra, nVidia has provide official Drivers named Nvidia Web Driver, You need to pick the right version against your current Mac Version, 10.13.0 has different driver from 10.13.6.
4. Picking a Kelper Nvidia GPU is a MUST for Mojave or Catalina. Comments from forum suggest RX570. I am wondering if a RX460 from China, which is the salvage of Crypto Mining Machine is a good deal
4. You MUST go to Recovery Mode and UNMOUNT the system volume to convert the primary partition to APFS
5. Don’t need to install the NullCPUManagement.kext. The AppleIntelCPUPowerManagement.kext should be fine and working with the Clover C-State parameters


sudo xcode-select --install
/bin/bash -c "$(curl -fsSL https://raw.githubusercontent.com/Homebrew/install/master/install.sh)"


brew install git [email protected] nvm wireguard-tools
nvm use 14
brew tap hashicorp/tap
brew install hashicorp/tap/terraform

curl "https://awscli.amazonaws.com/AWSCLIV2.pkg" -o "AWSCLIV2.pkg"
sudo installer -pkg AWSCLIV2.pkg -target /

brew install --cask intel-power-gadget clover-configurator
brew install --cask iterm2 cheatsheet intel-haxm
brew install --cask maczip foxitreader
brew install --cask google-chrome firefox
xx brew install --cask microsoft-office
brew install --cask sublime-merge sublime-text
brew install --cask visual-studio-code intellij-idea-ce pycharm-ce dbeaver-community
brew install --cask wireguard-tools qbittorrent vlc
brew install --cask whatsapp telegram microsoft-teams
brew install --cask spotify

https://officecdn.microsoft.com/pr/C1297A47-86C4-4C1F-97FA-950631F94777/MacAutoupdate/Microsoft_Office_16.29.19090802_Installer.pkg